CC

CG study (After Effects, Nuke, Maya...), English study and more.
Showing posts with label After effects. Show all posts

Friday, April 25, 2014

[Nuke][AfterEffects]リアルなグローの作り方:"光の減衰率"を意識する


リアルなグローの作り方:"光の減衰率"を意識する

今回は合成におけるグローのテクニックについて。MPC, Millの実写合成の現場で学んだ事、自分が教えてもらった事や今迄本やネットから学んだ事に通じている「基礎」をご紹介します。詳しい点は省略しています。結局細かいところはどうするの?と疑問に思われるかもしれませんが、一番大事な所を紹介するのであとはこれを踏まえてオリジナルのアイデアで画を作りつつ仕上げて下さい。

タイトルに[Nuke][AfterEffects]と付けていますが、Nukeをメインに説明します。それは今回一番のポイント光の計算をリアルに再現出来るのがリニア計算合成ソフトのNukeだからです。(過去記事参照)しかし、AfterEffectsでも見た目で近い感じに再現はできます。

リアルなグローを作るにおいて、一番大事なポイント!
光は逆2乗の法則(Inverse-square law)で減衰する
ネットから画像を拝借しました。こんなイメージです。


ここからNukeをベースに話を進めます。
グローといえばGlowノードだ!となるかもしれませんが、Glowノードは、デフォルトのsize以外を変え無い場合、inputをBlurして、Plusで乗せるのと全く同じです。色々Glowのパラメーターを調整しても、結局光の拡散のベースがBlur(デフォルトgaussian)になっています。gaussianブラー計算のアルゴリズムは難し過ぎて私も理解していませんが、結局ピクセルを平均化しているのであってこれは逆2乗計算ではありません。ここにリアルに見えない大きなギャップがあります。


リアルにするには、逆2乗で光が減衰していく計算をさせれば良いのですが、そんなデフォルト機能はありません。エクスプレッションやプラグイン作成で出来るはずですが、私が経験した現場ではデフォルトノードの組み合わせでリアルに逆2乗で光が減衰している「っぽい」ものを再現しています。画作りなので見た目最終調整することになるので、いまから紹介するテクニックでいつも事足りています。そのテクニックとは、

異なるBlurサイズを加えたレイヤーを重ね合わせていく


・・・です。(上画像参照)厳密に光の減衰率を再現していませんが、エクスプレッションで管理することによりリアルに近いものが再現できます。Blurのsizeをレイヤーごとに2倍、4倍、8倍・・としていき(ここがポイント)、Multiplyノードでだんだん重ね具合を弱くしていきます。あとは、作りたい画次第で重ねるレイヤーの数や減衰具合を調整します。Keyer(luminance)を組み合わせると、明るい所程グローさせる事ができます。MPCやMillではこの考え方をベースにしたオリジナルgizmoが使用されています。

以前紹介したSliceToolで光の減衰具合をみれば、こちらのテクニックを使用した方が逆2乗減衰に断然近いのがわかります。


After Effectsでも同じ考えで作ればいいのですが、超!!!気を付けなければいけないのが、After EffectsはNukeと違いデフォルトがリニア計算でなく、sRGB計算です。プロジェクト設定で描画モードの計算をガンマ1.0(=リニア計算)に出来ますが、計算が重くなる、他の計算に影響する、などあります。After Effectsは元々はリニア計算合成用に設計されたソフトではないので、現場で使ってどのような影響があるか私自身やったことがないので未確認です。それでも、プロジェクト設定を変えなくてもこの記事に書いた事を意識して作業すれば「エフェクト:グロー」一つで済ませるよりぐっと奇麗なグローが作れます。ComperKさんのブログで丁寧な解説がされてますので是非参考にして下さい。

コンポジター地獄行き!:After Effectsで綺麗なグローをつくるテクニック

他参考資料
Autodesk Area "光の減衰"
wikipedia 逆2乗の法則


記事が役に立った!という方はAmazonギフト券(15円〜)で支援してくださると今後のモチベーションになります!「受取人」にshizuka67(アットマーク)gmail.comと入力お願いします 詳しくはこちら


Thursday, March 28, 2013

[Composite][Nuke][After Effects]合成Tips: 煙、霧は"Screen"しない


煙や霧の素材をScreen合成するのは「理論的には」間違いです。
きちんとマスクを作成してOverで合成すること。

基本の考え方として
Screen, Plus…発光しているもの、反射
Over…背景を遮るもの。

「理論的には」と書いたのはもちろん場合によってはScreenで見た目の結果が良ければそれで良いですしケースバイケースだからです。ただ、Screenで重ねるのが普通と思っている人が結構いるようなので、基本的にはOverが正解です。

Nukeだとこんな感じです。Noiseノードを実写の煙素材と見立てています。


Tuesday, September 25, 2012

[Nuke][After Effects]After EffectsからNukeに移行する時気をつける事


After EffectsからNukeに移行する時気をつける事


日本もここ数年でNukeがかなり普及してきましたが、まだ年数的に浅いです。
私自身After EffectsからNukeにツール移行しました。After Effects使うのやめた訳ではなくAEの方がNukeより断然経験年数多いですが、自分も含め同じパターンの人が同じところでつまづいているのを沢山みましたのでパターンを書き出してみます。

このつまずくという理由について自分なりに推察した2つのツールの大きな違いです。各メーカーの情報(ヘルプなど)開示具合を見つつ私が普段これらを使っていて根底に感じるところです。
After Effects(Adobeツール全般): 内部処理などあまり気にしなくてもさくさく作れるのを目的としている。
それ優先ゆえに、クオリティ(色数、エッジ処理など)は時には内部処理で自動的に犠牲にする。Adobeソフト同士の連携の都合も大きいと思う。

Nuke: 内部処理をユーザーが理解するという前提で作られている。
理解しているとかなりのクオリティを保てるが、理解していないとどんどんユーザーがクオリティを落としてしまう。

この理由から「AEの感覚」でNukeを使うのがいかに正しくないのかわかり、頭を切り替えて使用する必要があります。
また、2つは元々の目的が全く違うツールなのでどっちが良いとか悪いとかと比較するのははっきり言って見当違いで不満がある場合は目的とツール(と予算?)がかみ合ってのが殆どだと思いますが、違うものという事を認識する機会がない場合があるようなので参考にしてもらえればと思います。
このblogのNukeダグを遡ってもらえればNuke根幹の大事な部分を説明している資料を紹介しています。


[なんかちがう]
・NukeでMerge>"Add"モードにしてもAEの加算と全然違う・・→Nukeはリニア計算。
・なんか、rampとかのfalloff具合がAEと違う→Nukeはリニア計算。(rampの計算方法に"linear" "smooth"などオプションあり)


[あれがない!]
・AEのスナップショットが無い!→ありません(ツール作ってる人あり)viewer wipeとかviewer複数横に並べる。
・AEのレイヤーのlockみたいにNodeのlockができない!→できません(ツール作ってる人あり)


[AEのノリで使っちゃだめなの?]
いずれも駄目ということはないがAEと違ってNukeではどんな計算がされているか理解した上で使用する必要がある。使っちゃ駄目か、駄目じゃないか、でなく、理解しているか、理解していないか。

・Mergeの"screen"、"overlay", "hard light"などAfter Effectsで良く使用されるモードはNukeで(も)計算上値がクリップされている。

・NukeのHistogramノードをAEの"レベル"のノリで使うとノード足した瞬間に値が0-1にクリップされる

・NukeカラコレノードにあるSaturation, Gamma, Contrastを操作しすぎると0未満1より上の値が激しく変わって恐ろしい数値になるときがある


[After Effect使用時は意識しなくて良いがNuke使用時は完璧に理解する必要があること]
・Unpremult/Premult計算

・ReadノードWriteノードの"premultiplid"チェックを適切に設定する

・Nuke上では読み込んだ元素材がjpgでもexrでも8bitでも32bitでも意図的に特別な事をしない限り絶対絶対32bit floatのリニア計算になる。0未満1より上の値を大切に。

・Mergeの "Over" "Plus" "Multiply"の式暗記。「隣り合ってるマスク同士に隙間が!」問題はこれらを理解していれば解決出来る場合がある。(素材自体に問題がある時もある)この3つを提示しているのはこれら(+Invertノード)でかなりの種類の計算ができるから。


[番外編]
"AEもノードベースになればいいのに"→"動画版Photoshop"が元々のコンセプトなのでありえない

記事が役に立った!という方はAmazonギフト券(15円〜)で支援してくださると今後のモチベーションになります!「受取人」にshizuka67(アットマーク)gmail.comと入力お願いします 詳しくはこちら


Friday, July 27, 2012

[Nuke]32 bit float計算Tips1:マイナス値と仲良くなる

32 bit float計算Tips1:マイナス値と仲良くなる

Nuke上ではすべてが32bit floatで計算されます。
1より上0未満の値の扱い方を知っておく事がとても重要ですが、今回はマイナス値に限ってTipsを紹介。
マイナス値の扱い方を知っていないといつの間にかクオリティを失っている、意図しない結果がでる、なんて事があるので知って仲良くなりましょう。

自分の経験を元によく使うけど気を付けないと、と思ったものをまとめました。他にもこんなのあるよ、とかこんな場合注意した方がいいよ、とかあればコメントお願いします。


Tips1: マイナス値があると不都合があるのでクリップする必要がある場合の例
・アルファチャンネル。意図がある場合を除いてアルファは常に0-1に収める。
・マイナス値を含めた計算結果自体は正しくても、「ユーザーが意図しない結果」になる時(例えば、マイナス値とマイナス値をmultiplyするとプラス値になり、元々「真っ黒」だったものが「明るく」なる)

[マイナス値を自動的にクリップするノード例]
・Grade(デフォルトのblack clampチェックオンの場合)
・Mergeノードのオペレーション一部(ポップアップヘルプの式参照)


Tips 2: マイナス値をキープしたまま適切な処理が必要な場合の例

・motion blur、world positionチャンネルなど素材が元々マイナス値をもっているものを扱う時
・IDistortのuvマップを作る時(+、-、で上下左右のどちらにピクセルが移動するか決まる)
・マイナス値を維持したまま作業したい時 プラスに戻したい時0未満がクリップされていると元に戻せない。(floatでプリレンダリングして後行程に素材を渡す場合も含む)


Tips 3: 操作によっては元々プラス値だったピクセルをマイナス値にするノード例
・カラコレ各種のパラメーター(Gradeは、black clampのチェックが外れている時)
"blackpoint"、"lift"、"offset"、"saturation"
・Sharpenノード
・Addノード(カラコレノードの"offset"と全く同じ)

Tips 4: マイナス値があるかどうかチェックしたいとき

・1ピクセル単位→ピクセル値の表示を見る。
・水平軸単位→Samplerノード
・画面全体の中→ClipTestノードでlowerは0、upperは10000とかにする。Expressionで"0未満なら○○(自分の好きな数値)にする"と書く。


Tips 5: マイナス値だけ0にクリップしたい時
・Clampノードでminimumだけenableにする
・Expressionノードを使う

Tips 6: Mergeノードで自動的にマイナス値がクリップされるのを避けたい時
・MergeExpressionを使う

番外Tips : After Effects
ちょっと気になってAfter Effects CS4の32bitモードでアルファ頑張ってマイナス値にしてみようとしましたが、アルファチャンネルに限っては32bitモードでも強制的に常に0-1に押えられているようです。After Effectsは色んな処理の内部でrgbも含め値をコッソリクリップしているので注意。

Friday, May 11, 2012

[etc]Rolling shutter資料

Rolling shutterの分かりやすい資料がyoutubeにあったので紹介します。

Rolling shutterとは:
CMOSセンサー(上から下に向かって映像をスキャンする)カメラで速く動く物体を撮影したとき画像が歪む現象

After Effects CS6では標準で改善機能がつくようです。
The FoundryはAfter EffectsとNuke用の改善Pluginを提供しています。
↓きもいきもい!プロペラです。これはpluginではどうにも...w

↓しくみ

↓iPhoneでもなるよっという例


 CCDセンサだと上下スキャンではないのでRolling shutter現象は起こりません。

Saturday, October 15, 2011

[Nuke]concatenation確認テスト


前回のfilter typeの記事書いた後、ふと疑問がわき上がったのでテスト。ヘルプにもしかしたら書いてるかもしれないけど、自分でやってみてスッキリしたいので。

テスト:
Nuke上で例えばTransformノードが複数連なってたらそれぞれのfilter("Cubic"とか"Impulse"とか選ぶところ)はどう影響するか?

結果:
一番最後のノードのfilterだけ結果に影響を及ぼした。

画像の、真ん中の4つ連なったTransformノードだと、一番下のfilterは有効。それより上の3つのTransformノードのfilterは何を選んでも結果に影響を及ぼしませんでした。concatenation(連結計算)が効いているからこうなります。

むかーーーし買って、未だに参考にしてるGnomonのDVD "Visual Effects Compositing Fundamentals" のマネしてTransformの間にGradeノード挟んでみたら見事にconcatenationが切断状態されて絵が超キタナくなった(´Д`)画像左側。

concatenationに関してはAfter Effectsでも気をつける必要があります。"コラップストランスフォーム"でヘルプ検索してみてください。

参考:Visual Effects Compositing Fundamentals (Gnomon DVD)
DVDではShake使ってますがコンポジティング全般向けの内容。 おすすめ。

Wednesday, June 16, 2010

[After Effects]-GenArts Tinder Upcoming Plans

GenArts Tinder Upcoming Plans

quote:
GenArts does not have plans to introduce a 64 bit version of our current Tinder product for After Effects
.
For those customers moving to Adobe CS5, GenArts is offering a cross-grade option from Tinder for After Effects to the 64 bit Sapphire 5 for After Effects for a special price

I am using Tinderbox for After Effects.
not big fan of Tinder though, it's kind of sad..

Tuesday, May 18, 2010

[After Effects]-report: "Other new and changed features in After Effects CS5"

report: "Other new and changed features in After Effects CS5"

AEP projectに書いた記事の英訳版です。(若干内容を再編集しています)AEP projectが他言語未対応の為、サイト主催のllcheesell / Ogataさんに相談した結果、
英語版はひとまず自分のブログに掲載する事にしました。英訳記事作成にあたってはAfter Effects region of interestの著者、AdobeのTodd Kopriva氏に協力を頂きました。

This is a translation of an article I wrote on AEP project.
Since AEP is not ready for multi-language yet, I write English version on my own blog here.

Todd
Kopriva, author of After Effects region of interest from Adobe, kindly helped me get this English article done. Thanks Todd!


Here is my report about After Effects CS5 new and changed features in which I personally got interest.
I intentionally avoided to write about "Top new features" such as Roto Brush, 64bit native etc. because they're often featured.

As you may notice, there are some crucial changes like keyboard shortcuts, effects names and additional options when After Effects upgrades. I recommend checking all those changes at once.


(From here, Italic sentences are summary of official online help here and others are my impressions.
"Ctrl/Cmd" means if you're using Windows, press "Ctrl", if Macintosh, press "Command".)

[Projects and compositions changes]
In previous versions, if you were entering or editing text when it was time for an auto-save, you would be forced out of text-editing mode. Now, if you're in text-editing mode when it's time for an auto-save, that auto-save is skipped
-This means you can never be interrupted when you edit text, folder names, layer names or expressions.

There is a list of common frame rates in Composition Settings that allows you to just select one of them.
-I often switch between 29.97 and 59.94 so this feature would be handy for me.
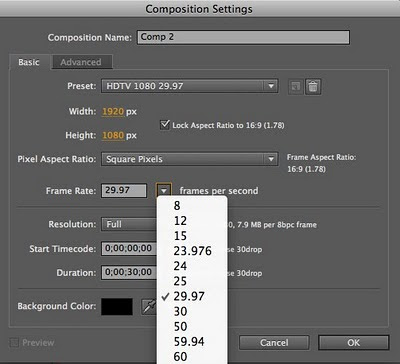

The composition background color setting is now located in the Composition Settings dialog box, and the keyboard shortcut for accessing only the composition background color(Ctrl/Cmd+Shift+B) has been removed
-This is kind of complicated because I used to use the shortcut often before CS5.

When you double-click a precomposition layer when the Roto Brush tool or a paint tool is active, the precomposition layer opens in a Layer panel. To open the nested composition in a Composition panel instead, Alt/Option-double-click the precomposition layer
-This means the process in CS5 is opposite to that of CS4.

[Importing and managing footage items changes ]
Removed ability to open or import After Effects projects created by versions of After Effects 5.5 or earlier
-You should be careful when you open a project created by an older version.

Double-click a footage item in the Project panel: open it in a Footage viewer.
Alt/Option-double-click a footage item in the Project panel: open the source file in the media player assigned for that file type by the operating system
select a footage and hit Enter on the numeric keypad: open selected footage items in a Footage viewer

-Again, the process is different from CS4. I'm not sure the difference between "Alt/Option-double-click a footage item" and "Edit original (Ctrl/Cmd+E)"...to me, it looks both process are doing the same.


[Layers and properties changes]
The Camera layer now has type option, one without point of interest (1 node), and the other with point of interest (2 node).

Dragging with the Unified Camera tool selected and the right mouse button pressed temporarily activates the Track Z Camera tool and modifies Position only

Dragging with the Unified Camera tool selected and the right mouse button pressed and Ctrl (Windows) or Command (Mac OS) pressed temporarily activates the Track Z Camera tool and modifies both Position and Point Of Interest

-When you create camera animation, check out these new feature above and enhance your operation.

[Views and previews changes]
When you click the Current Time control in the upper-left corner of the Timeline panel, you can now enter a time directly in the box.
-The dialog box no longer pops up.


[Text changes]
Added ability to orient each text character around its anchor point toward the active camera with Orient Each Character Independently option in Auto-Orientation dialog box
- You have more option when you create 3D Text animation.

[Effects and animation presets changes]
The results of changes in the Curves effect are now shown as you drag in the Effect Controls panel
-Small change, but huge difference for me.

Removed entries in Effects & Presets panel and Effect menu for the Paint effect (and Paint category) and Puppet effect (from Distort category), because there's no need to apply these effects directly. Use the corresponding tools to apply the effects
-This makes sense...I've never applied those effects directly at all.

The Alpha Levels effect has been removed. The alternative is Levels effect.

The Vector Paint effect has been removed. Compositions created with a previous version of After Effects that use the Vector Paint effect will still render, but you can no longer edit the effect.
The alternative is paint tools and shape layers.
-If you used to use these effects, be careful!

[Memory, storage, and performance changes]

The time that After Effects takes to start is reduced. The start-up time for the background processes used in Render Multiple Frames Simultaneously multiprocessing is also reduced.
- I checked out the speed to launch CS5 on my computer...it's really faster than previous version!

[Keyboard shortcuts and miscellaneous user interface changes]

With a camera tool selected, move the camera and its point of interest to look at selected 3D layers : F
With a camera tool selected, move the camera and its point of interest to look at all 3D layers: Ctrl/Cmd+Shift+F

In the Project, Render Queue, and Effect Controls panels, you can use the arrow keys to expand or collapse groups.


-Changes above would accelerate your speed of operation.


Summery: my own personal impression
Pros:
-Manipulating camera can be quicker, easier than previous version.
-Curve effects show the result as you control. That's huge.
-Performance has been improved.

Cons(I get confused every time After Effects upgrades):
-Through CS3 to CS5, the operation of opening precomposition has been changed one version by one version.
-Likewise, the operation of viewing footage item has been changed. Thinking this feature is frequently used, it may not be handy.

[System environment]
Mac Book Pro
OSX Leopard
2.5GHz Intel Core 2 Duo
4GB RAM

Saturday, May 1, 2010

[After Effects]-After Effects CS5 report

I wrote a After Effects CS5 report @ AEP project, a community site for Japanese users.
On this report, I wrote about "Other new and changed features" because they're rarely featured.

Anyone interested in reading the article in English?
If you are, let me know by commenting on this post or email to shizuka67[at]gmail.com.

Wednesday, March 3, 2010

[Maya][After Effects]-Using Motion Vector pass in After Effects

Using Motion Vector pass in After Effects (Reel Smart Motion Blur Pro for After Effects required)

Reference web site


here's my test...
Even if it takes lots of steps, you could save huge render time in Maya eventually with this method!
I wonder if there are any other effective way to do this...


Monday, February 8, 2010

[After Effects]-a bug using Trapcode Particular

I faced a bug with Trapcode Particular and posted question to Support forum here.
I summarize the question and response hoping this could be helpful for people who face similar problem.

According to Peder Norrby (Trapcode), this could be a bug of After Effects or Particular.
-------------------------------
[Issue]
Particles are visible in less than half resolution, but are not visible partly or totally in full resolution

[Cause](response from Trapcode)
The coordinates of Emitter Position are too big to be handled in full resolution

[Resoltion](response from Trapcode)
Move every Emitter Position closer together
or
Change Emitter Type to Light (Light doesn't have this problem)
-------------------------------
After Effects CS4
Trapcode Particular v1.5.1 and v2
Mac OSX

Saturday, February 6, 2010

[After Effects]-Trapcode Form basic tutorial


just finished watching basic tutorial of Trapcode Form...
I could use Layer Map to create logo animations. cool!
I'm using Trapcode Particular/Star Glow/ Form heavily...just can't live without them.

Trapcode Form - Training by Peder Norrby

Sunday, December 20, 2009

Sunday, December 13, 2009

[After Effects]- Tips-Three examples of using Guide Layer

Tips- Three examples of using Guide Layer

I often use Guide Layer feature in After Effects but found out it's not that much popular among other After Effects users...at least users around me.
So, I'll give three examples hoping you get the idea about this feature.

You can use Guide Layer as....

1. guide in pre-composition


Guide layer is not rendered. In addition, not visible in parent composition.

Say, in this example, you want to add Drop Shadow for all arrow layers but still want to view white path in pre-composition so that you can adjust the position of arrow layers.
All you need to do is copy the white path layer to pre-composition and set that as Guide Layer.
The detail is shown in image.

Instead, you can simply add Drop Shadow for pre-composition in parent composition. The white path in pre-composition is invisible in parent composition anyway.

2. (very) noticeable memo for yourself or other user who uses your project file


3. original title/action safe

Thursday, November 19, 2009

[After Effects]-Mocha Tutorial by Ben Heusner

I had no idea I could use Effect>Channel>Calculate for keying until I watched this tutorial!
I haven't even used Calculate... it was good to know.